How to Configure CoreDNS for DNS Over TLS
CoreDNS makes DNS-over-TLS easy to implement
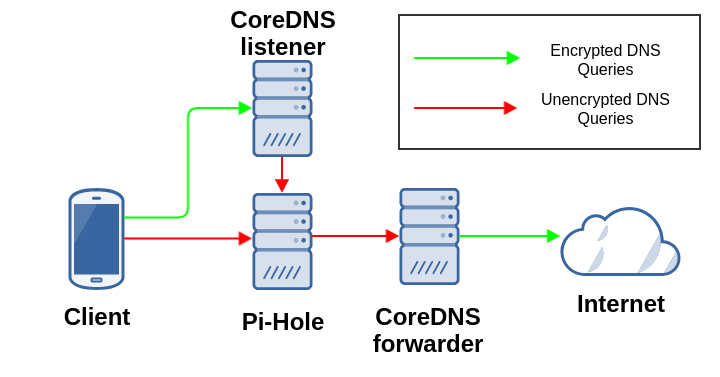
In this tutorial, we’re going to run CoreDNS in Docker containers. One container will listen for standard DNS queries on port 53, and it will resolve these queries using DNS-over-TLS upstream. Another container will listen for DNS-over-TLS queries on port 853, and will resolve these queries using standard DNS.
I’m going to assume that you have an intermediate DNS server, like a Pi-Hole, which will cache responses and filter out ads. We’ll set everything up so that your Pi-Hole will forward queries to the container that encrypts our upstream queries using DNS-over-TLS, and the container that listens for DoT will forward queries to our Pi-Hole for filtering.
I would highly recommend running these containers on an x86_64 machine, since it will be much simpler than trying to run them on an ARM machine like a Raspberry Pi. This guide will not work on a Raspberry Pi: you’ll need to make some tweaks to get it functional.
To start, make sure that both Docker and docker-compose are installed on your system. You can learn how to install Docker here.
And, assuming that you’re on a Debian-based machine:
sudo apt install -y docker-compose
Now, let’s clone the repository that contains some config files we’ll use:
git clone https://github.com/gdbarton/simple-coredns-tls.git && cd simple-coredns-tls
Let’s look through the config files and verify that everything is accurate for your purposes.
First, the coreconfig-up file. You can change the upstream server if you’d like, or lengthen the cache if you’re not using a Pi-Hole:
. {
  forward . tls://9.9.9.9 tls://149.112.112.112 {
    tls_servername dns.quad9.net
    health_check 10s
  }
  cache 60
}
Now the coreconfig-down file. Make sure to change the ‘forward’ address to that of your Pi-Hole (or any other standard DNS server):
tls://.:853 {
  tls /etc/coredns/cert.pem /etc/coredns/key.pem /etc/coredns/ca.pem
  forward . 192.168.0.2:53
  log
}
You’ll notice that the coreconfig-down contains a cert, key, and CA. You can follow a guide like this
to make one, or you can generate it using the configure.sh file that I provided (must be run with sudo). You can hit Enter on all of the
prompts without entering any information.
If you don’t use my configure.sh script, make sure you move the coreconfig files and the three .pem files into the
/etc/coredns directory, and that they all have the correct names.
Finally, check the docker-compose.yml file. If you’re running CoreDNS on the same server as another DNS server, you’ll need to change the two 53s before the colons (on lines 6 and 7) to a different number, like 5553:
version: "3"
services:
        forwarder:
                image: "coredns/coredns"
                ports:
                        - "53:53/udp"
                        - "53:53"
                volumes:
                        - "/etc/coredns/:/etc/coredns/"
                command: -conf /etc/coredns/coreconfig-up
                restart: always
                container_name: coredns_up

        listener:
                image: "coredns/coredns"
                ports:
                        - "853:853"
                volumes:
                        - "/etc/coredns/:/etc/coredns/"
                command: -conf /etc/coredns/coreconfig-down
                restart: always
                container_name: coredns_down
Once everything is verified and in the right place, we can bring up the containers:
docker-compose up -d
Verify That It Works
We need to start by installing the program kdig, which will let us test our new DNS containers. On Debian, run:
sudo apt install -y knot-dnsutils
Let’s verify that the forwarder is resolving DNS queries. From your client machine or Pi-hole, run this:
kdig @IP -p PORT yahoo.jp
…where IP is the IPv4 address of your CoreDNS machine, and PORT is the leftmost port you listed in the docker-compose file for the forwarder container.
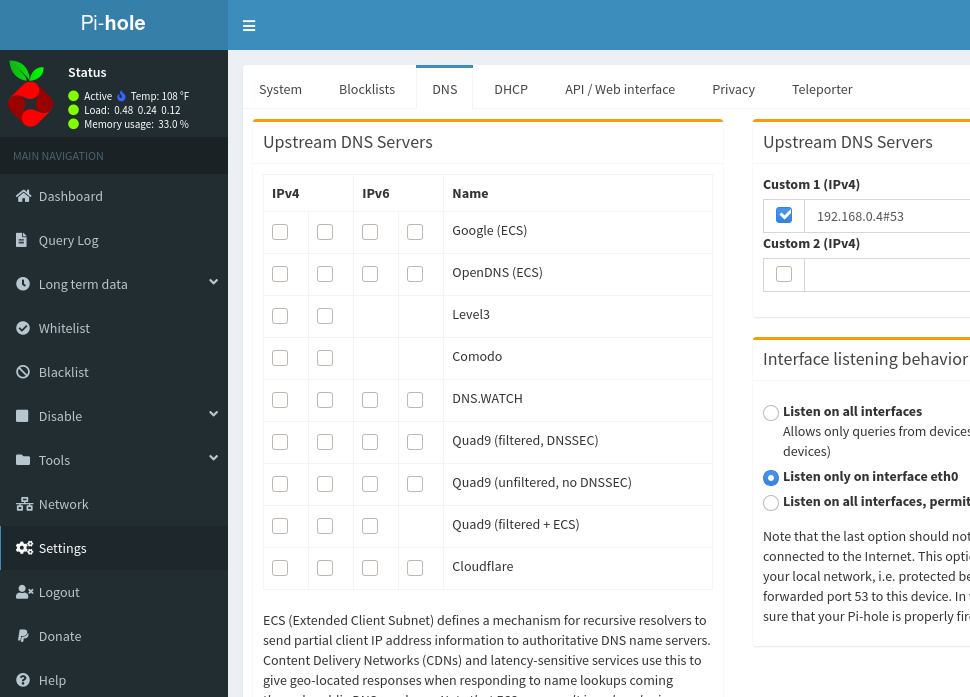
If the DNS resolves correctly, we can point all of the machines on our network to the CoreDNS forwarder. In the Pi-hole
web GUI, hit Settings on the left, followed by DNS at the top. Under Upstream DNS Servers Custom 1, enter the IP
address and port of your CoreDNS forwarder (the same IP and port we used in our dig command above):
Finally, we need to test the listener container. Again from your client machine or Pi-hole, run a kdig command:
kdig @IP +tls example.com
You can configure DNS-over-TLS on your client by using a program like dnsproxy
If both of your kdig commands return addresses, then congratulations, your CoreDNS containers are working properly!